How To Customize Your Notifications In Hive
We all want to stay on top of our actions so that our team can hit its project deadlines. Luckily, Hive’s notification settings make it easy and convenient to track progress as it happens and make sure you never miss an upcoming due date. Whether you’re in the office, working remotely, or always on the move, here’s how you can customize notifications in Hive to suit your needs.
When you have new notifications in Hive, an orange circle will appear next to the bell icon at the top right of your screen. By clicking the bell icon, you will see your notifications categorized by the following:
- All: Includes every notification in one place
- Mentions: Notifications when someone has @ mentioned you in comments or Notes
- Assigned to me: Notifications specific to your tasks
- Archived: Notifications you’ve already address and therefore chosen to archive, which removed them from other tabs
We understand that you might not need to see every single one of these notifications. Here’s how you can customize your preferences to best fit your needs.
Locate your Notification settings
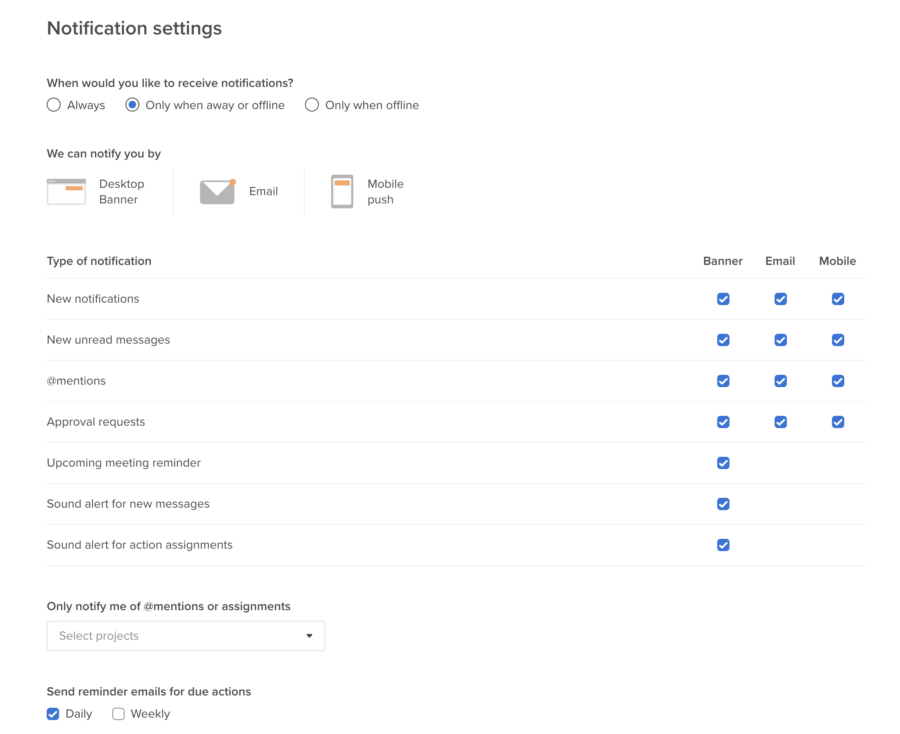
Notification preferences can be found within your profile settings. To find them, click on your profile photo (or initials) in the top right corner of the Hive dashboard. Scroll down to ‘Notification settings’ and click.

Within these settings, you have multiple options to customize how you receive notifications in Hive. Need help deciding which alerts you should keep and which ones you can live without? Here are questions to ask yourself.
1. When do you want to receive notifications?
If you are logged in and haven’t interacted with the app recently, your status will change and Hive will send you email and mobile notifications. That way you can be sure that you are updated on everything your team is doing. Note that your status will change from active to away after 10 minutes of inactivity. Your status will switch to offline when you’ve closed out of the app entirely.
You will see three options for when you would like to receive notifications:
- Always
- Only when away or offline (this is the default setting)
- Only when offline
2. Where do you want to receive notifications?
Hive sends notifications via the following channels:
- Desktop
- Mobile
You can dictate which notifications you’d like to receive on each specific channel by selecting the boxes beside each item.
4. Choose what you’d like to be notified about
By default, all boxes are checked when you first log into Hive. You will receive notifications for the following:
- New unread messages
- New @mentions
- Upcoming due dates
- New assignments
- Approval requests
- Upcoming meeting reminders
Want to opt out of a specific group of notifications? Simply de-select the box and you’re good to go.
Additional customizations
To remain focused on your most critical projects, you can set notifications so that you receive alerts solely on certain projects. Select the dropdown menu under ‘Only notify me of @mentions or assignments’ and check the projects for which you want to receive alerts.
Another handy option in ‘Notification settings’ is that you can set reminder emails for your due actions to arrive either daily or weekly. If you have the Timesheets option set in Hive, you can set reminders for yourself – even on a recurring schedule.
You can see Notification settings in action for yourself in our useful how-to video here:
Learn how you can make the most out of Hive with our video tutorials and handy how-to guides. Hive is the world’s first democratically built productivity platform. Explore how Hive can help your team move faster here.
