" transform="translate(6.667 25)" width="26.666666666666668px"/><path d="M 6.667 13.333 C 10.349 13.333 13.333 10.349 13.333 6.667 C 13.333 2.985 10.349 0 6.667 0 C 2.985 0 0 2.985 0 6.667 C 0 10.349 2.985 13.333 6.667 13.333 Z" fill="transparent" height="13.333333333333336px" id="m1fSvCRzI" stroke-dasharray="" stroke-linecap="round" stroke-linejoin="round" stroke-width="3.33" stroke="rgb(13, 27, 62)" transform="translate(13.333 5)" width="13.333333333333334px"/></svg>)
" transform="translate(5 6.667)" width="30px"/><path d="M 0 0 L 0 6.667" fill="transparent" height="6.666666666666666px" id="CaiNLpJCJ" stroke-dasharray="" stroke-linecap="round" stroke-linejoin="round" stroke-width="3.33" stroke="rgb(13, 27, 62)" transform="translate(26.667 3.333)" width="1px"/><path d="M 0 0 L 0 6.667" fill="transparent" height="6.666666666666666px" id="xGLT9Vw9m" stroke-dasharray="" stroke-linecap="round" stroke-linejoin="round" stroke-width="3.33" stroke="rgb(13, 27, 62)" transform="translate(13.333 3.333)" width="1px"/><path d="M 0 0 L 30 0" fill="transparent" height="1px" id="uv_5VZMDi" stroke-dasharray="" stroke-linecap="round" stroke-linejoin="round" stroke-width="3.33" stroke="rgb(13, 27, 62)" transform="translate(5 16.667)" width="30px"/></svg>)

We have all seen creative teams that are naturally resistant to structure; therefore, implementing processes can be nearly impossible.
But processes are a must, especially for agencies that want to facilitate creativity and increase efficiency and consistency, which is what clients like P&G are demanding now.
Unilever is right behind them too, with Unilever’s Chief Marketing and Communications Officer Keith Weed, saying “If [agencies] simplify the complexity, I’ll buy the product.”
Related: Why Meditation Is The Next Big Productivity Tool
Every year businesses lose 20 to 30 percent in revenue due to inefficiencies, and they’re clearly over it.
The solution? Document and implement some processes for your agency before yours becomes the next on the chopping block.
In this post, you’ll learn how to document a process, and get an in-depth process example to help jumpstart the development of your processes.
What is a process exactly?
A process is a systematic series of actions directed to some end goal.
Process documentation provides a detailed description of how to carry out a business process. It includes all types of documents that support a process, including:
policies
checklists
tutorials
forms
screenshots
links to other apps
process maps
It’s used as a guide to help employees at all levels, including decision makers and stakeholders, quickly understand company processes. To help your business run smoother, you can also hire a registered agent to handle and process all of your documents.
Related: How Working Out At Lunch Made Me 90% More Productive
Why create processes?
A process can help with a few things:
It helps identify bottlenecks, which will decrease inefficiencies.
It helps onboard new employees faster, and train current employees for new roles.
It helps preserve company knowledge.
It shows who is responsible for what tasks, so there are no gaps or overlap.
How to Create a Process
Step 1: Identify your biggest opportunities.
Gather your team; list your core business functions; and identify your biggest strengths and weaknesses.
Break down each main business function into subsections, and prioritize your highest impact areas from there. To start, pick three to five high-impact processes to focus on and document first.
You’ll probably want to focus on the projects/processes you repeat the most often and that are client-facing.
Action Item: Pick three to five high-impact processes to map out.
Step 2: List all the steps in the process.
Pick a process to focus on first, and gather your entire team together again to visualize the process on a whiteboard.
Visualize the process as is before you try to optimize it.
“Every detail of a process is more or less affected by every other detail; therefore the entire process must be presented in such form that it can be visualized all at once before any changes are made in any of its subdivisions” — Frank Bunker Gilbreth
This meeting may move slowly at first because it can be difficult to extract the tasks out of your people who are so close to the process and not to mention, everyone won’t be bought in at first.
Related: What Your Horoscope Says About Your Work Style
It won’t take long though to get people to speak up. As the information trickles in, add post-it notes to the whiteboard. Your goal is a raw list of every single task that goes into the process.
Action Item: Write out every single task, in chronological order, for each process.
Step 3: Reduce the number of steps.
Next, count the number of steps in your list, so you know how many you began with, then try to eliminate as many as you can.
In the first round of simplification, you should be able to reduce your list by 30 to 50 percent, according to Andrew Grove, author of High Output Management.
To simplify, you must ask: Why do we perform X step?
Usually, you’ll find many steps exist in your workflow for no good reason.
While going through this step, look for items that:
Overlap with other activities and will happen regardless of whether you include this task in your workflow.
Don’t need to happen.
Were useful, but now, outdated.
Exist for office bureaucracy. More eyeballs lead to slower, inefficient processes. Trust your team.
Action Item: Reduce the steps in your process by 30 to 50 percent.
Step 4: Consolidate tasks.
Not only do you want to remove steps entirely, but you’ll also likely want to group similar tasks together. This reduces complexity and increases efficiency.
Make sure each task begins with a verb so each person is clear on what they need to do to complete the task.
Action Item: Group similar tasks together, making sure each one begins with a verb.
Step 5: Define what done looks like.
If you’re delegating the tasks, then make sure you write out your expectations of each task.
Ask yourself: What does done look like before the person carrying out the task marks it complete?
Action Item: Explicitly state your expectations for each task.
Step 6: Connect tasks to roles.
Now, it’s time to assign roles to complete the tasks.
You may be wondering why I say “roles” and not “people.” That’s because you don’t want to input people’s names because people leave, get promoted or switch companies, so you don’t want to have to constantly update your process to change people’s names.
Action Item: Choose which role will complete which task.
Step 7: Consider how long each activity takes.
This is where your team comes in handy again.
Show all assignees in the process, the process you’ve mapped out so far, and then ask: How long do you think it will take to do XYZ?
Their answers to this question will help you consistently meet project deadlines.
This step will also provide you with insight into the opportunities for different assignees to be working on different tasks simultaneously, allowing you to increase efficiency and reduce timelines.
Not only will this step give you insight into realistic workloads for each team member, but also how much time you should actually scope out for each type of project you map.
Action Item: Ask each team member for an estimate of how long it takes to complete each task. Have them time themselves, if they aren’t sure.
Step 8: Reverse engineer timelines.
How far in advance do you like to see projects completed by?
With the answer to the above question in mind, begin at the bottom of your task list, and work your way up, asking: “How many days before launch does the last task in my process need to be complete?”
This won’t be perfect. Just use good judgement. By the end of this step, you should know how many days in advance you need to schedule projects for in order to complete them ahead of schedule.
Action Item: Decide how many days before launch each task must be completed.
Step 9: Make a living, breathing digital process map.
Now, that you’ve done all the hard work, it’s time to map out your process so it can be easily found, read and used by your team.
Key Definitions
A task is the most basic description of work.
An activity is a set of tasks.
An activity box is the rectangle on a process map. It typically has a verb and a subject. For example, “Review submissions.” There could be more than one task in an activity box.
You’ll need a combination of tools to create an effective process map.
Map out the process in mindmapping software, such as Mindmeister, which allows you to attach docs and/or include links to checklists with more details (or steps) for each activity. For activity itself, I recommend using Google Docs.
Once you’ve done all of the above, consider organizing your processes in a wiki, using Google Sites, or something similar.
Action Item: Formalize your workflow in mindmapping software.
Example: Client Qualification Process
Let’s dive into an example process that every agency can implement. A good client intake process helps you do a few things well.
It helps you weed out bad clients. Why waste your time and energy on clients, who aren’t serious about working with you or who don’t have the budget to hire you?
It streamlines your intake process. By systemizing and then automating your intake process, your streamlining the time it takes to get more clients onboarded, which means getting paid sooner.
It helps you manage client’s expectations. You must manage client expectations, and a great way to do this is through a “welcome package” PDF in your initial email. I’ll talk about this in more detail below.
It makes your agency look more professional and in higher-demand. Humans naturally want what they can’t have. When you create a beautiful intake and onboarding process for prospects and new clients you leave a better impression.
It helps clients understand the process of working with your agency. Most clients don’t know the first thing about working with agencies. It’s your job, as the expert, to guide them through it.
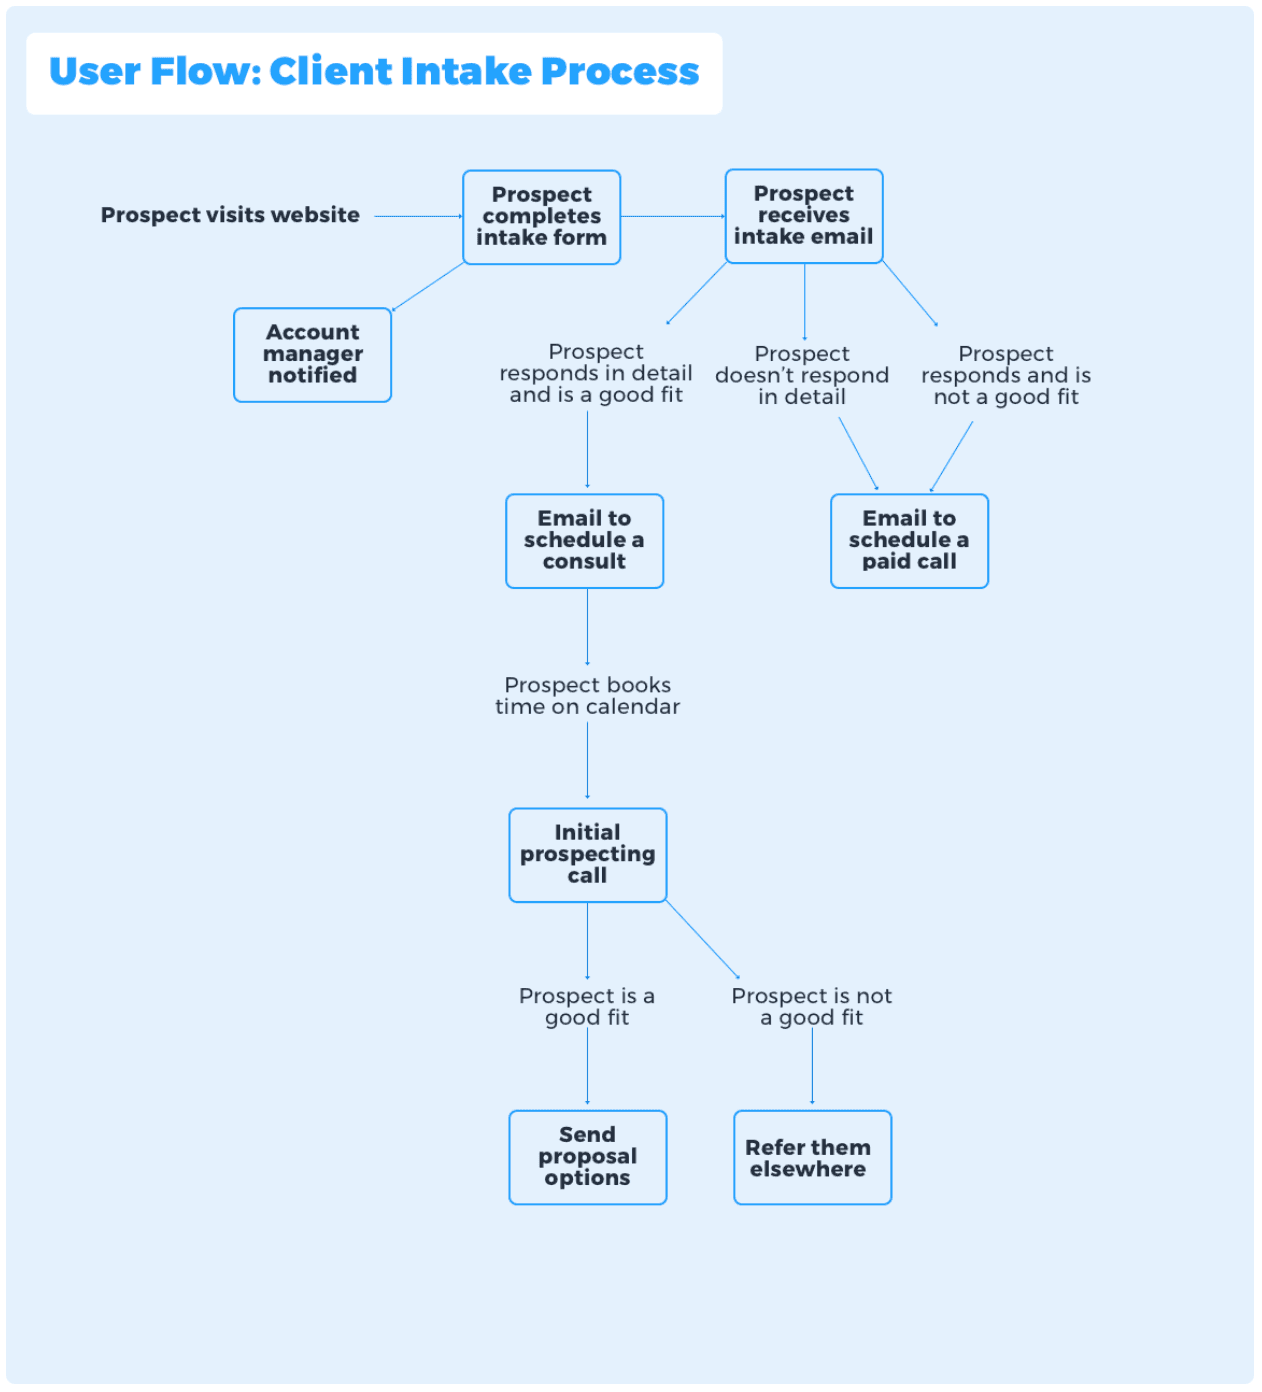
Step 1: Create a client intake form.
For the purpose of this article, we’re going to assume that all prospects reach out via a form on your website (because customer journey maps and different touchpoints are an entirely different post).
Pick a page on your site. The “Contact” page is probably a good place for it, although you can embed it throughout your website.
After you decide which page you want to place your intake form on, next, you need to choose a form tool.
If you built your website with WordPress, then you could install a form plugin, such as Gravity Forms or FormCraft. The benefit of a WordPress plugin because it eliminates the monthly recurring fee that comes with most form builder tools. Before installing the plugin, make sure your WordPress hosting will support the plugin you want to use.
If you don’t have a WordPress site (or if you do), you can hire WordPress developers or simply choose any form builder software your little heart desires and embed on your web page. Typeform and Wufoo are popular choices for building forms.
What information should you request?
We’ve seen as few as three questions and as many as 10 questions on these forms. Keep in mind, the more information you request, the less form completions you’ll get.
So if you’re hungry for work, we suggest keeping questions to a bare minimum. In this case, we’d only ask three questions:
Name
Email
Website URL
If you have the luxury to vet clients more thoroughly, we recommend adding a few more questions to “qualify” your leads.
Qualifying questions will vary across industries.
Here’s a few ideas to inspire you:
Please describe your business and how you make money.
Why are you interested in our services? What brought you to us?
Who is the internal stakeholder(s) on this project?
What’s your budget?
When do you hope to get started on this project?
Anything else you’d like to add?
Keep your contact page clean and minimal, including only one call-to-action (CTA), which would be to complete the form. This will reduce distractions for site visitors, and prompts them to complete it.
Step 2: Set up a notification email to yourself.
The overwhelming majority of form builders allow you the option to receive a notification every time your form is completed. This ensures you know what’s going on, and don’t skip a beat.
Pro-tip: You could use Zapier to pull the information from these notifications and input them into a spreadsheet, and then funnel them into a list – or even a specific group within a list – so you have an organized spreadsheet of leads, and automatically route the notification to the right person.
Step 3: Send a welcome email to the lead.
For this step, you’ll most likely need a subscription to an email service provider. If you need help finding one, check out this fantastic, in-depth ebook chapter from Zapier that breaks down the top 25 email marketing apps.
What should your welcome email include?
Your welcome email should say something like:
Hi, [Insert first name]!
It’s a pleasure to e-meet you. We appreciate you taking the time to reach out, and we’re excited to learn more about your business and your current situation.
In order to preserve your time, I included a brief welcome PDF (see attached) so you could learn more about our agency and our process.
We also included a few more questions for you to answer. You can answer those questions here. (Here should be hyperlinked to another form with more questions. Consider including any of the questions listed in Step 1.)
Once you complete the form, I’d love to hop on a 30-minute Skype chat (or Google Hangout) – whichever you prefer – to discuss this opportunity in more depth.
To save us the back-and-forth, you can view my calendar here, and choose a time that works best for you. (“View my calendar here” should be hyperlinked to a calendar scheduling tool, such as Calendly or any similar alternative.)
Feel free to email me back with anything else that’s on your mind that I didn’t ask or answer yet. Anything and everything you’re thinking will help us be more productive on our call.
Look forward to connecting!
How should this email look?
We recommend keeping this email simple and personalized because it makes it feel less automated and more authentic. Just make sure it’s easy to read and only include text.
You can also check out these email marketing statistics to fully understand the importance of proper formatting and sending the right email.
Step 4: Streamline the video call.
You’ll have to do a 30-minute introductory call, after they schedule their time to chat with you.
Here’s a call script, recommended by Kai Davis.
“OK, so we have 30 minutes and I have another call straight after you so we’ll need to keep to time, is that OK?”
(yes)
“Thanks for that. So my job today is really simple. I’m going to ask you a bunch of questions, to work out IF or HOW I can help you. If I feel like I can’t help you, I’ll let you know politely, and do my best to point you in the right direction. If I feel like I can help you, we’ll book in another time to talk about how — is that OK?”
(yes)
“Perfect, let’s get started.”
And these are the questions Davis asks during that initial call.
Tell me about your business. How does it make money now?
How can I help?
Why do you need this help now?
Why did you reach out to me? Why do you think I’m the person to do this?
What’s holding you back from getting the results that you want?
What’s specifically missing, broken or not working?
You mentioned a few issues. Which has the greatest impact in the short-term?
Let’s say things work out, can you walk me through the process of you deciding to work with me?
What questions do you have for me?
Step 5: Send the final email.
Craft two email templates: one for clients you don’t want to work with and one for clients you do want to work with.
Here’s a template for each client type.
What do you say if you don’t want to work with a lead?
If you don’t want to work with someone, then simply refer them to another resource. This way you still accommodate them, and they get something for the time they spent completing your process.
Say something like:
Hey [Insert First Name].
Thank you so much for taking the time to explain your situation. I really appreciate you reaching out.
Unfortunately, this project is not a good fit for my skill set. I can recommend a few people and resources that would help you though.
If you’d like me to send those your way, let me know. I’m happy to help.
Thanks again!
What do you say when you want to work with a lead?
This email should summarize the call. Use a portion of Davis’ template, pasted below.
Hi [Insert first name]!
It sounds like your top three problems are:
You want $result but $obstacle,
You have $problem and it’s costing you $impact, and
You don’t have $desired_thing and it’s hurting you because $cause.
It was great chatting with you and learning more about your business. I understand your {client’s goals / objectives}. After our call, I’m confident that I’d be able to help you move forward and grow.
I’ve outlined a few options below. I recommend the first option, but any of these will help you as you grow. {insert options and next steps}
Of course, if you have any questions, reply back, and let me know.
Thanks!
And then it’s onto the onboarding.
Save time and make more money.
Processes don’t exist to limit creativity. They exist so your team can focus more on being creative and spend less time on administrative work.
Remind them of this, if/when they attempt to push back on your process mapping project.
By documenting your agency’s processes, you’ll increase efficiency, consistently deliver high-caliber work, and in turn, make more money, all while doing less work.


" height="21.708px" id="ocyW7qRll" transform="translate(1 1)" width="22.825000000000003px"/></svg>)
" width="23.345px"/><path d="M 16.453 17.099 L 19.081 21.658 C 15.218 24.615 9.208 24.973 4.759 21.568 C -0.024 17.954 -1.4 11.36 1.539 6.134 C 4.692 0.594 10.591 -0.631 14.389 0.266 C 14.288 0.489 12.013 5.209 12.013 5.209 C 12.013 5.209 11.833 5.221 11.731 5.223 C 10.609 5.271 9.772 5.532 8.876 5.995 C 6.879 7.037 5.529 9.002 5.271 11.239 C 5.139 12.357 5.294 13.49 5.721 14.53 C 6.081 15.41 6.591 16.192 7.276 16.852 C 8.326 17.866 9.576 18.493 11.026 18.701 C 12.397 18.898 13.716 18.703 14.953 18.081 C 15.416 17.849 15.811 17.591 16.273 17.239 C 16.331 17.201 16.383 17.153 16.453 17.099 Z" fill="rgb(255, 73, 44)" height="24.000281511058695px" id="XZw0UJF9D" transform="translate(0 0.001)" width="19.081280403406165px"/><path d="M 5.071 2.811 L 4.431 2.182 C 4.308 2.06 4.19 1.933 4.063 1.814 C 4.018 1.771 3.965 1.712 3.965 1.712 L 4.026 1.584 C 4.268 1.098 4.647 0.744 5.096 0.461 C 5.593 0.146 6.173 -0.014 6.761 0.001 C 7.514 0.016 8.214 0.204 8.804 0.708 C 9.24 1.081 9.464 1.554 9.503 2.118 C 9.569 3.069 9.175 3.798 8.393 4.308 C 7.933 4.606 7.438 4.838 6.941 5.112 C 6.667 5.263 6.432 5.396 6.164 5.67 C 5.929 5.945 5.917 6.203 5.917 6.203 L 9.477 6.199 L 9.477 7.784 L 3.982 7.784 L 3.982 7.631 C 3.962 6.852 4.052 6.119 4.409 5.411 C 4.737 4.762 5.247 4.287 5.859 3.921 C 6.332 3.639 6.829 3.399 7.302 3.118 C 7.593 2.945 7.799 2.692 7.798 2.324 C 7.798 2.008 7.568 1.727 7.24 1.64 C 6.466 1.431 5.678 1.764 5.269 2.472 L 5.071 2.812 Z M 11.957 14.561 L 8.957 9.381 L 3.02 9.381 L 0 14.615 L 5.98 14.615 L 8.932 19.771 L 11.956 14.561 Z" fill="rgb(255, 73, 44)" height="19.770929946899415px" id="twZYfi9ck" transform="translate(11.391 0.852)" width="11.957px"/></g></svg>)