


Are you searching for the key to happy clients? As a freelancer, it’s important to make sure your clients see your work as a success. It all boils down to keeping your projects on time, within budget, and as collaborative as possible. Luckily, this is where Hive can help. Hive itself was born out of the need to work smarter with internal teams and clients during consulting engagements, and to this day, the most robust features of our platform aim to help teams:
- Plan the project effectively
- Assign the work and do the work in the same place
- See actionable status reports
- Reduce time-wasting loops
So are you ready to optimize your projects, deliver great results for your clients, and improve your team’s internal workflow while you’re at it? Let’s get into it.
Step 1: Choose to work in action cards vs projects
Before you start to build out your client projects in Hive, it’s important to think about how long and complex your projects are. This will determine whether you organize your work as projects, which are used to structure longer or more complex engagements, or action cards, which are smaller tasks that exist within one of those larger projects. Our rule of thumb covers most use cases:
- If your client project typically takes longer than 30 days or more than 10 major steps, these would usually be projects.
- If your client project is typically shorter than 30 days, or fewer than 10 major steps, the work is usually action cards.
Here are examples demonstrating when it would be best to use action cards versus projects for your client engagements.
A) Action Cards
In the below example, each of the blog articles (client deliverables) are on an action card within the Client Communication Rebrand project. Each article has about 5 to 6 steps and takes a few weeks to complete:

B) Projects
In the below example, the Client Website Launch has a few components: design, animations, development, QA & user testing. The timeline spans a few months. Because of the complexity and length of this engagement, it makes sense for the Client Website Launch to be structured as its own project.

Step 2: Pick your starting point
Before your team can start working, you have to set up your Hive platform based on how your client engagements typically begin. Pick the option below that’s closest to your workflow — and if more than one apply to you, that’s okay! You can set up each one to make sure all of your work finds its way into Hive.
a) With a client brief
We recommend setting up Hive Forms to manage the intake process, and ensure there are no miscommunications between your client’s vision and what your team needs to get started. Once you have your Form created, be sure to share the URL with your client – they do not need to be a Hive user to send a form submission to you. Review our Forms Tutorial here and watch our Video Tutorial here to learn more.
“Forms and templates in Hive have helped us take on new business at a rapid pace and grow the company without compromising our quality of work. Our process has been streamlined such that each team member is now enabled to spend more time on client work and less time on communications and information gathering.” – Ruthie Baer, Director PMO at 85Sixty. Learn more about this agency’s transition to Hive here.
b) With an email request
If you usually receive requests for client work via email, we recommend you connect Hive Mail, which will link your Outlook or Gmail inbox right to your Hive dashboard. With Hive mail toggled on, you can also use the ‘Create action from email’ command to quickly turn incoming requests into actionable to-dos for your team. Once an email is turned into an action card, you can slot it into the correct project and assign it to a team member.
c) With a weekly, monthly or quarterly planning meeting
If your client work typically begins in meetings, we recommend you create a Hive Note series for this recurring meeting. Once in the note, you can share it with your teammates, create action items directly from the meeting, and then put each of these actions right into its corresponding project. The next time this meeting occurs, simply open your existing Hive Note to add a new entry to the same thread and revisit actions from previous meetings. It’s the best way to keep everyone on the same page and store all information in one place.
Step 3: Transfer existing work into Hive
Where is your client work tracked now? Depending on whether you are coming from another tool, or if this is your very first time using a formal system, it’s time to transfer all of your existing work into Hive. There are a couple ways to do this, and if you have work in multiple locations, don’t worry! You can add work using all of the options below if needed.
a) You’re starting in Hive with a blank slate
This is for people who are not importing from another tool or copying a list of tasks from anywhere. You’ve already created your projects, so now it’s time to create action cards with each of the deliverables your team is currently working on for each one. This is a manual task, so it will be helpful to ask another member of your team to assist.
b) You’re importing from another tool
Hive can ingest project data from other tools when it’s exported in common formats like CSV or JSON. Hive has also built importers for tools like Basecamp, Trello, Asana and Smartsheet. If you’re transferring work from another common tool, Follow the import guide here to easily gather project data and import it into Hive.
c) You have a list of tasks in Excel or other spreadsheet
If you have a list of tasks in a spreadsheet or word doc, simply copy and paste to put them into Hive.
d) Save your project as a project template for future use
If you import a project and will have similar projects that require the same steps and activities, save your project as a template that can easily be applied for new projects. Refer to the project template guide for best practices on setting up your templates.
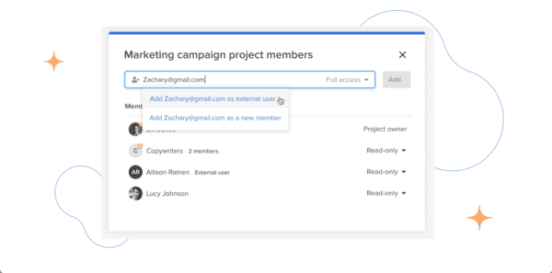
Step 4: Rally your troops
Now is a good time to add your team members to the Hive workspace and assign them to their tasks. You can invite them and add them to the relevant projects all at once.

Step 5: Grant or limit visibility to clients
Depending on how closely you collaborate with your clients, Hive has a few different levels of visibility that you can choose from. Each of these levels will grant certain levels of permissions and limit information shared. Start where you feel comfortable.
a) View Only
View Only permissions allow you to share a read-only project link with clients, so they can view the project timeline in real-time. This eliminates the ‘stale project plan’ problem, which happens when the PDF you’ve exported of your project plan is immediately out-dated once the snapshot is taken. Save yourself the administrative, low-value work (and spare the client’s inbox) and give them a real-time-always-updated view into how the project is progressing.
b) Collaborators
If you work closely with your clients, and often need them to complete work as part of your project plan, we recommend adding them as External Users to the specific project where you want to assign them to-dos. This level of transparency, while new for some teams, pays off when there is clear communication & mutual responsibility between you & your client. Achieving a successful outcome together is one of those intangible ‘value adds’ of great partnerships.
c) External Approvers
Need to send your client files for review and to collect their feedback? Hive makes it easy to share proofs and request approval from users outside of Hive. To do this, you’ll want to add each client as an External Approver when you are routing creative files.
Step 6: Benchmark your project status
Based on where your current status of projects is, we recommend adding a Status update to each project as you create them in Hive. You can do this from the Project Homepage (also known as the Project Overview page), or from Portfolio View. Status updates are helpful for keeping everyone aware of progress, and all updates are stored in your Project’s Status history.
Step 7: Turn upcoming client feedback into actions
Now that your projects are all established, here’s an expert tip to work faster and expedite turnaround time for client requests: connect Hive Mail to your Gmail or Outlook inbox. If you didn’t already do this as part of your work transfer process, this is an easy way to easily manage and assign future client requests that come in via email.
So how does it work? The next time you receive a client email that is related to your project plan and requires someone to take action, turn it into an action card and put it into the respective client project in Hive. Keep it as a brand new action card, or if it’s tied to something you are already working on, you can add it as a subaction to an existing one. We guarantee that if you use Hive Mail to keep track of tasks, you’ll reduce the time you spend re-typing requests and disseminating to the team.
So there you go! With these initial steps, you can use Hive to support your client engagements from all angles: Planning, Doing, Collaborating & Completing. Here’s to a great partnership! ????


