No matter how long you’ve been using a tool, app, phone, game, or any piece of technology, there are always questions that pop up. It’s impossible to understand every nook and cranny of a product — unless, maybe, you were the sole product builder, which only happens rarely.
As we’ve spent the last four years building Hive, we’ve constantly iterated on past versions, features, shortcuts and integrations, working to make Hive the best it can possibly be. That means that things are constantly changing in the app per your feedback, which is a good thing. But we understand that can bring up new questions. Even more so if you’re a beginner who has just started to utilize Hive regularly.
But fear not, we’ve got a solution. We’ve rounded up ten of the most common Hive-related questions on one page to help break down your biggest FAQs. They’re broken into two categories, “Getting Started” and “Intermediate,” so you can sift through based on your overall familiarity.
Getting Started
1. How Do I Set Up An Account In Hive?
All Hive accounts are free to create and come with a 14 day free trial of Hive (no credit card required). This is the most basic Hive question we receive regularly at our support desk.
There are three quick ways to create an account with us.
- With your email address
- With your Slack account
- With your Google account
- Go to our sign up page.
- If you are signing up with Slack/Google, click the icon and authenticate accordingly.
- If you are signing up with your email address, then enter your email address and choose a password.
- Fill up the other details
- Click Continue
Setting Up Your Workspace
Now, you have various options to set up your workspace. In Hive, we believe you should work the way you want to work. So customize away!
- Choosing your messenger
Hive gives you an option to use either our Native Messenger or to use your existing messenger.

- Name your workspace

- Creating your First Project

- Add Actions into your project

- Add your teammates into your workspace

- Sync your files with our native file integration

Congratulations! Now that you are all set up, go and experience Hive.
You can check this article to learn more about Hive’s interface. To learn more about signing up for a Hive subscription, read this article.
2. How Do I Enter My First Tasks in Hive?
Start by entering a few tasks on your own My Actions list, by using the blue +New Action button in the top right, and selecting yourself as the assignee. Enter at least 3 tasks for upcoming work you have to complete, select a due date and check them out on the My Actions tab along the top navigation bar.

When you created those actions, did you notice all the possible details you can add to the action card? We recommend starting simple, but a few things you can add into an action card include:
- Due date – The date that you’re striving to have the action item done by.
- Project – You can create projects in Hive and assign actions to specific projects.
- Assign – Assign the action card to a specific person so they understand what they’re responsible for.
- Sub-actions – You can create sub-actions within a larger action and assign to individual teammates.
- Attachments – Use the blue + sign button at the bottom left of the card to add a file to any card.
- Labels – Use the blue + sign button at the bottom left of the card to assign labels to cards.
3. How Can I Bring My Team Into Hive?
Now it’s time to think about who will need access to Hive so that they can be be assigned work, comment and collaborate, attach files, review progress, move projects forward to the next stage, and close them out.
Add your co-workers. For primary members of the workspace who have access to multiple projects – invite them in using email, and selecting which projects they should see – simply using the +person button next to +New action button:

Organize everyone. If your co-workers are organized into departments or teams, you’ll want to add that team structure to Hive so you can more easily add them to projects, and specifically @mention a team in chat groups and comments. You can find the Teams section from your profile menu (your avatar in the top right), then selecting Your workspace > Manager Users.
Include any external users. Collaborate with freelancers or work closely with clients or vendors? Add them as an external user. They will have access to a single project, and its associated chat group, if one exists. Click on that External Users tab as shown in the above screenshot, to add an External User to one project.
4. How Do I Create Projects and Labels?
Head to Project Navigator, click +New Project button, and enter a name. You’ll see options underneath for some optional fields:

- Due date – flag to the team when the project is expected to be completed or launch
- Labels – categorize your work
- Description – an optional free text area that includes key scope or description that you would like all members to reference
- Attachments – stored in the project details area.
- Parent project – you can make this project a child or sub to a parent project. We recommend making Parent projects if you have many client projects under the same client, or you have departments, and sub-projects underneath each department in your organization.
- Phases – If your work is ordered into different lifecycles, we recommend adding them as phases.
On the next screens you’ll pick the layout, and decide on the sharing permissions.
With the project created, start collaborating with your team:
- Do you have repeatable steps in your workflow? Set up action templates.
- Post a comment on an action card to keep conversation in context of the task at hand
- @mention your teammates to call their attention quickly to your question or comment
- Check your Notifications feed – (look for the bell icon in the top right) – it’s your command central for tasks and items that need your attention. You can always choose when and how you get notified, too.
Intermediate
5. How Can I Import Tasks into Hive?
Getting started in Hive is much easier when you can copy in your tasks from your previous tool. Plus, it only takes a minute to do.
Here’s how:
Open up the main menu & select “Import tasks,” and select the tool you want to import from:

Follow the instructions to download your .JSON file onto your computer from the tool you selected

Click the “Click here to attach” link and add the .JSON file
You’re done! Shortly your tasks will magically appear in Hive.
6. How Can I Integrate File Storage in Hive?
You can link Box, Dropbox and Google Drive with Hive. See and share your files without any disruption to your workflow!

And it is as easy as 3 steps.
- Click on “Add File” icon beside your avatar
- Select the cloud drive that your company is using
- It will open a new window that will require you to enter your username and password
- Sign in and you will instantly have access to all your files
You can now send items that are in your cloud drive to your team members on Hive.
You can attach files:
- To an action card
- In a comment on an action card
- To the Project Home page
- In a chat message
In order to attach a file in an action card, click on the paperclip icon either on the action or in a comment.

To attach a file in the Project Home page, navigate to the ‘Attachments’ section and click ‘+ Add Attachment’.

Finally, to upload a file to a chat message, click the + symbol on the left hand side of the chat bar when typing a message.

7. How Can I Use Hive’s Flexible Project Views?
My Actions
“My Actions” view is a list of all actions you create for yourself and that others assign to you. In My Actions, it is easy to see what you need to do and prioritize accordingly.
You can find your My Actions view in the center panel of your Hive workspace.
1. Add a few actions to your list
Click the box that says What needs to be done? Type what you want to do and press enter. Just like that, an action will appear on your list.
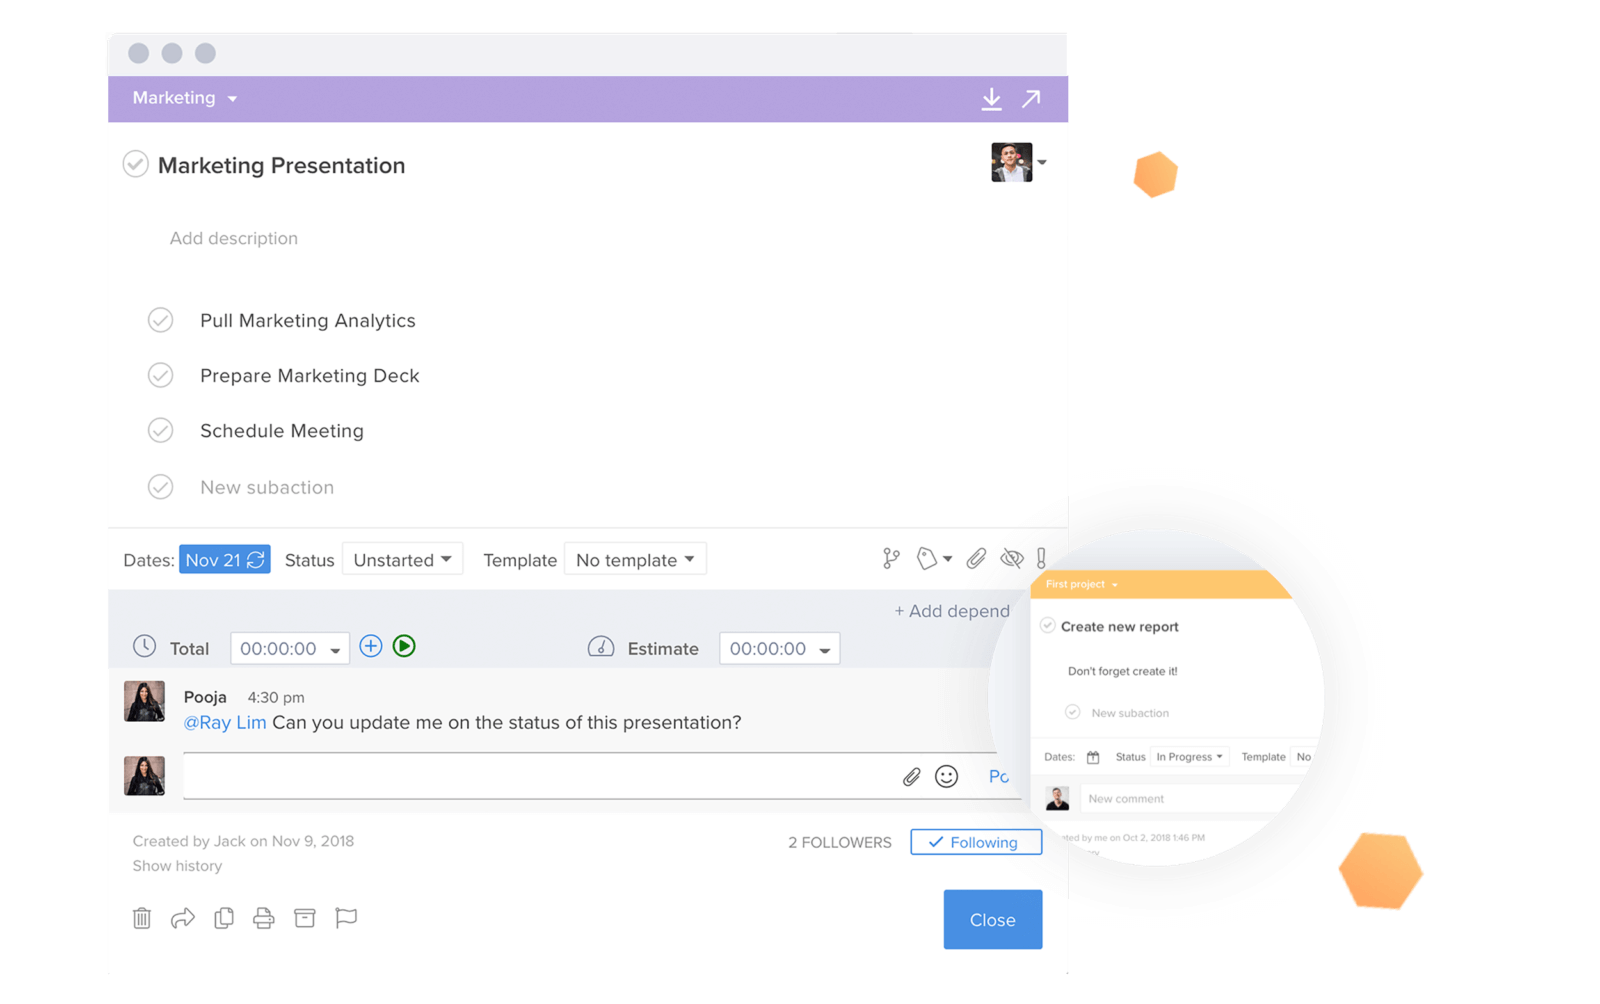
2. Build out your actions
Click on one of your actions, and it will open up a modal showing all the action details. There are a lot of details you can add to provide more context to your action, which we detailed in #2 above. Once you’ve added the details that are needed to complete the action, click close to leave the modal.
3. Organize your actions
Next, you can organize your actions and see how easy it is.
There are four categories to organize your actions:
- Now is a list of all actions you want to complete today. This is where new actions assigned to you by someone else will first land.
- Future is a list of all actions that are currently snoozed. For all snoozed actions, you set a date which you want to see them appear on your now list again.
- Completed is a list of actions that you’ve recently completed.
- Assigned by me is a list of actions that you’ve assigned others.
These different categories make it easy to automatically keep your list organized and focus on what is important. Still, it is easy to organize the way you want:
- If an action absolutely needs to be done now, you can mark it urgent. It will then show a red exclamation point on the action card making it easy to spot that the action is important.
- If one of your actions is personal, you can mark it private. That way no one on your team besides you can see it. All private actions will show an eye icon on the card so you can identify them easily.
- Try out the search bar to find your actions. Just type in a word and all the actions that contain that word will show up in a list.
Kanban

A Kanban board is a powerful workflow visualization tool. Tasks are represented by cards that are organized in lists. Each list represents a step in a work process.
Simply drag and drop the cards around different status columns as they move through the process. (Think sticky-notes or post-its).
It is perfect for visual thinkers. You can create Kanban boards in Hive by using Status View.
Creating a Kanban Board
- Go to “Project Navigator“, click “+New Project”
- Enter project details and invite team members
- Select Status View as the project layout
- Press “Create” and it should open directly to your new project in Kanban

Editing your Kanban Board
Hive Status View comes with three default statuses: Unstarted, In Progress, and Completed. But you can change any status and add as many as you want. That way your team can customize it to their needs — the possibilities are endless.
Gantt
With Gantt charts, Hive allows you to plan and execute your project, all in the same tool. Let’s take a look.
- Go to the project navigator and select +New Project
- Give it a title and add description, due date, and attachments as needed

- Select sharing settings (you can read more about that here)
- Choose ‘Gantt View’ as your project layout and select create

- It should open your new Gantt project. Click +Add an action, type the name, and press enter. Just click in the Gantt chart to give it a start date and deadline. Here’s what a fully laid out Gantt view can look like:

Once you’ve created a Gantt view, there are lots of ways to customize it for your needs.
Changing the timeline
Gantt view is defaulted to show you a timeline of several months, but you can change it. You can zoom in to look at a few weeks or zoom out to look at a project over a whole year.
Assign task
Assign a task to your teammate by clicking on the placeholder icon and selecting an assignee from the menu dropdown.
Exporting
From Gantt view you can export to PDF, PNG, Microsoft Project, and Excel, as well as limit the date range and hide assignees on the image exports.
8. How Can I Use Hive Apps?
Every team is unique and has their own tools, workflow, and goals. That’s why we’ve created Hive Apps. It’s one place where teams can go to manage their integrations and features to customize Hive. App information requests are some of the more common Hive questions we get.
Access Hive apps
To open Hive apps:
- Open the main menu and select “Hive apps” towards the bottom of the list
Using Hive apps
This is the Hive apps dashboard.

It includes two categories of apps:
My apps: Any integrations or features that you can access and use at an individual level.
- It includes all file storage integrations, video conferencing, and Zapier
Workspace apps: Any integrations or features that you can turn on and off for everyone in your workspace. Please note, only admins can turn on workspace apps.
- It includes access to premium features like forms, time tracking, and the home news.
Apps that are greyed out have not been added to your workspace.
Apps that have the logo in color and have a green check mark have been added.
Each app has a link to a help center article that explains how it works.
To add an app, simply click the slide button. Depending on whether it is an integration or a feature, you may need to enter login credentials.

9. How Do Hive Forms Work?
In Hive, you can create custom forms that anyone can fill out in their browser. Submitted forms automatically create an action card in Hive with all the form details.
Some great uses for Hive forms can include:
- collecting orders or requests
- submitting bugs and other issues
- gathering structuring information from employees (e.g. contact info)
- and much more!
How to Create a Form
- Enable “Forms” from “Hive Apps” if it’s not already enabled
- Go to the main menu (under your profile picture)
- Select “Forms”
- Click “+New Form”
- Add a title and description

- Drag and drop the fields you want to add to the form
There are 10 different fields you can add to a Hive form:
Checkbox Group

Date Field

File Upload (can support any type of file)

Header

Paragraph

Radio Group

Select

Text Field

Text Area

Ruler
The ruler tool is great for visually breaking up fields in the form.

Multi-text

…
Depending on which field you choose, you have the option to make it required, add help text, set a max character length, and other customizations.

- Add confirmation message
This is the message that the person will see after they submit the form.

- Set where you want to submit the form
Once someone has submitted a form, the data can go one of two places:
Email – you can provide an email and all the information provided in the form will arrive in that inbox. See below.

Hive Action – it will automatically create an action in Hive in the project and assigned to the person you select. It will look like this.

Each form come with a link that you can share or post on a website.
To access the link, scroll to the top of the form and you will see a white box with a link. Click the button “copy” to save it to your clipboard.

When a person clicks on the form, they will be taken to a web page that looks something like this.

There they can fill out and submit their information.
The “Form” feature is definitely an awesome way to get things done!
10. How Can I Automate My Work in Hive?
Hive Automation helps you move faster in Hive by automating common processes and streamlining your workflow.
With the click of a button you can:
- Move an action card to a different project
- Change an action’s assignee
- Add label(s)
- Add a new sub action
- Apply an action template
Let’s say my team is working on an app redesign and I want to be able to alert engineering to the presence of a bug. It would also be helpful to put that action on hold until engineering can properly fix the issue. We can easily do that with Hive automation.
Before getting started, you will need to enable Automation in Hive Apps. Once enabled, find the Automation tool in your profile drop-down menu.

This will take you to the Automation hub. You can manage existing buttons by enabling or disabling, editing, or deleting them. To add a new automation workflow, click + New automation workflow.

Name the workflow and decide which project(s) you want it to be applied to.

Once a workflow is created, it’s time to add buttons. These buttons will be visible at the bottom of each action card for the projects that this workflow is associated with.
Now, you can customize exactly how you want these buttons to function. In this case, I want to add a button that will alert the engineering team of this action by adding the ‘Engineering Team’ label. I also want to change the status to ‘On Hold’. I can add additional operations by clicking ‘+Add Operation’.

By default, this button will show on all action cards within the project. If instead I only want this automation to be available for a specific subset of actions, I can set some conditions for this button to be shown including what status or label the action card has. For this workflow, we will set this button to appear only when an action has a specific status; for example ‘In Progress’.

Once you save the automation, you will be able to see the new button on the action cards in the project(s) this workflow is applied to. Clicking the ‘Send to Engineering’ button will now automatically change the status of the action to ‘On Hold’ as well as add an ‘Engineering Team’ label to my action card.


