Meetings are at the core of our modern work structure, and with increasingly distributed hybrid teams these days, making the most of your meeting time is more important than ever. If you’ve organized or attended even a single meeting in your career, chances are you’ve faced with at least one of these issues:
- I don’t even know what this meeting is about. Could it just be an email?
- How can I make sure that the meetings we conduct are actually productive with everyone working from home?
- How can I be sure that everyone actually does what they say they’ll do before our next sync?
Fortunately, Hive is on a mission to create a brand new meeting experience. In this article, we’ll walk through how to optimize your Hive experience to run the best possible meetings and ensure timely and efficient follow-ups. A stellar meeting is a few minutes away.
Step 1: Sync your Calendar and Zoom via Hive Apps
Before running any meetings, you want to make sure your Hive Calendar is synced, along with your Zoom account if you’re planning on hosting virtual meetings via Zoom.
To sync your calendar in Hive, Click on the ‘Apps’ tab on your left-hand side panel. This is where you manage which apps you’d like to use in your workspace. The apps at the top of the window are controlled by your workspace administrator and apply to everyone on your team.
Scroll down to ‘My Apps’ at the bottom of the window, where you will find a wide range of productivity tools that you can choose to use in your individual workspace. From there, locate ‘Hive Calendar’ and ‘Zoom’ and check they are switched on (toggle right to turn blue). You will need to sign into your Zoom account to finalize the sync.
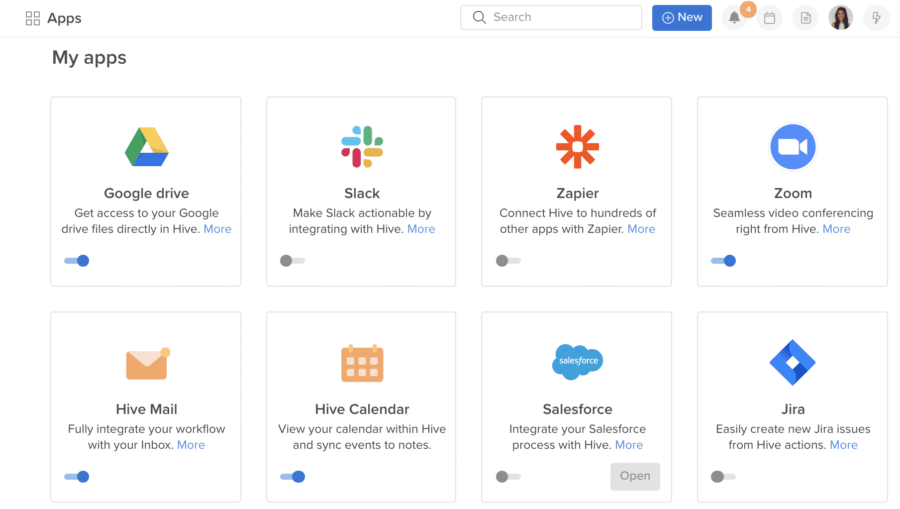
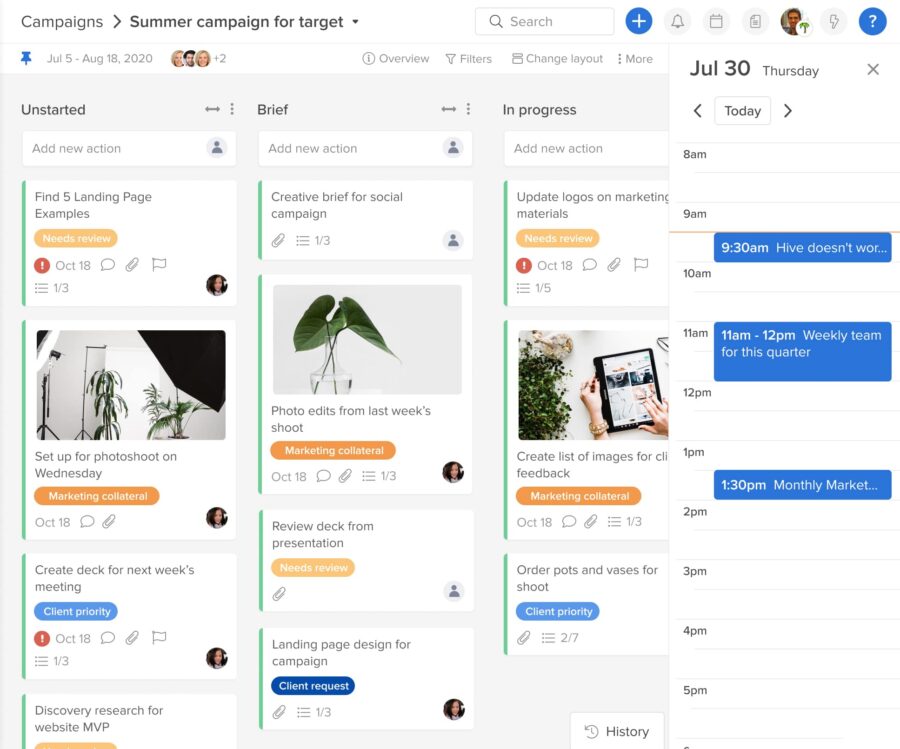
You will know your calendar is synced when you see the ‘My Day’ icon in the top right corner of your Hive window, which looks like a little calendar. Clicking on this icon will show your personal calendar, including all of your meetings, right within the Hive window. If the meetings are populated with a Zoom or Google Meet link, you will be able to enter the meeting simply by clicking on the event in My Day.
Step 2: Create a Note and link to your calendar event
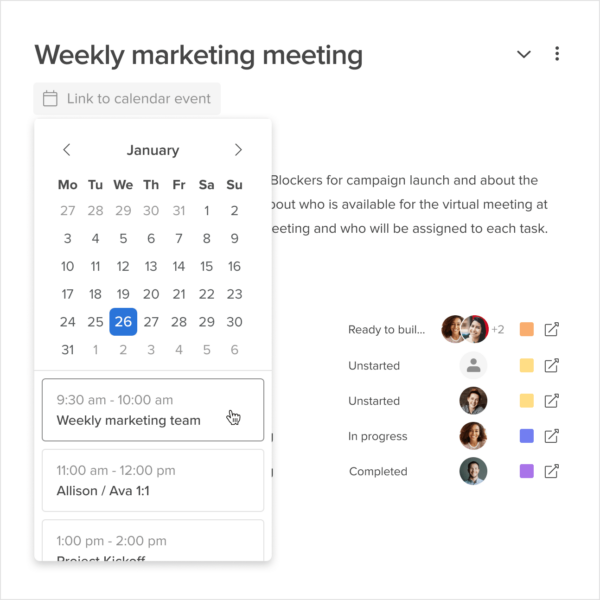
Hive Notes is one of the most useful tools in Hive to help your team run productive meetings. To begin, click on “Notes” the left Navigation panel to open the Notes window. Create a new note and give it a title of your choice. You can begin typing now, or you can go ahead and link it to the upcoming meeting it will be used for. This can be done at any point before the meeting begins.
To link it to a calendar event, you first need to make sure that your Hive Mail square is toggled on in Hive Apps. Once that is set up, you can link a Hive Note to any meeting existing on your calendar. Linking the Hive Note to your meeting will allow Hive to pull in relevant meeting information, like attendees and description, into the Note itself.
Step 3: Outline and share your meeting agenda
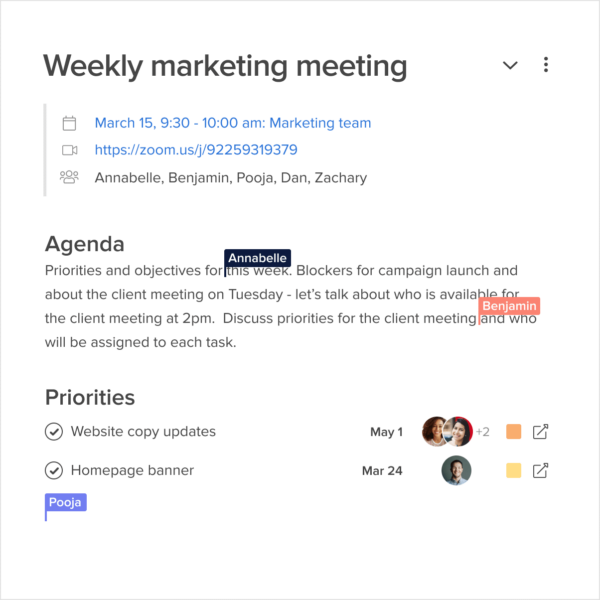
Every great meeting starts with an agenda. Prepare for the most productive meeting of your life by using Hive Notes to create a collaborative agenda, where everyone in the meeting can add notes and interact with each talking point as it comes up.
Simply type your agenda items to the note, or use one of our pre-built templates to help you get started. Once you’ve outlined your meeting, share your agenda before the meeting to make sure everyone shows up prepared. Do this by clicking on the “Share” button on the note’s upper right-hand corner. If you have external meeting participants or clients coming to the meeting, don’t worry. Notes can be sent externally as an email, regardless of whether someone is a Hive user.
Step 4: Start your meeting in Hive
You’ve sent around the agenda, and now it’s time to kick off the meeting. That’s where Hive’s Zoom integration comes into play. As long as you’ve already synced your Zoom account to Hive (visit step 1 above if you haven’t already) you will now be able to join Zoom meetings directly from Hive, without opening a separate app or browser window.
Here are a few of the different ways you can start your meeting from right inside the Hive dashboard.
1. Join directly through your Hive Notification
If you’ve toggled on the “Hive Mail” app and set that up, you’ll be able to turn on or off notifications for your meetings in Hive. With notifications turned on, you will receive a pop-up reminder 5 minutes before your meeting in the upper right corner of Hive. This reminder will prompt you to Open Zoom (if connected to your meeting) or Take Notes.
To turn this notification on or off simply visit your Notification settings in your profile picture dropdown. From there, select “Show notifications for upcoming meetings.” You can change these settings anytime. Once you’ve saved your notification settings, you can utilize Hive Notes for Meetings throughout any and all meetings, both internal and external, throughout your day.
Here’s what the notifications will look like:

2. Start a meeting in a message or group
Within a Hive chat message, you can start a meeting in a few ways:
- Type “/zoom” in the group or direct message. A Zoom meeting will automatically be started.
- Click on the Zoom icon on the top right corner of your messaging window.
- In the messaging input box, click the + button and select “Create Zoom Meeting.”

3. Join a meeting from your My Day calendar
When you click on the calendar button on the top right of the Hive dashboard, your day’s events will populate below. To Join a meeting, simply click into the meeting block and the meeting’s Zoom window will automatically open, letting you join without ever leaving Hive.
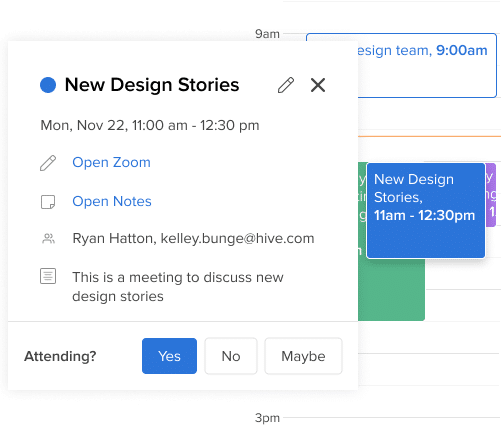
Note: To enable My Day, you need to sync your Hive Mail and Calendar via the ‘Apps’ window in Hive. Return to Step 1 above for more information.
Step 5: Assign next steps during meetings
Once you’re in the meeting, you can utilize the Notes collaborative functionality (whether via the Zoom app, or as a separate standalone window) to add ideas, next steps, and action items into the Note itself.
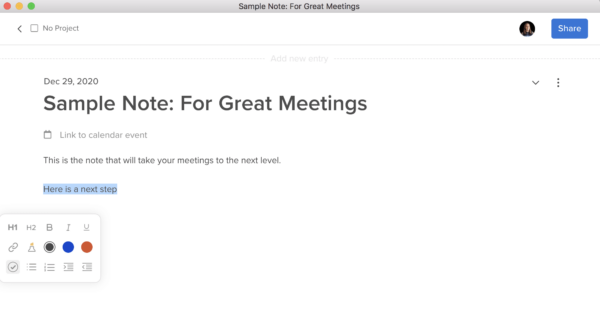
To add an action item into the Note and assign it as a next step, simply select all text that you would like to make a next step and click on the check mark on the bottom left hand corner of the formatting box.
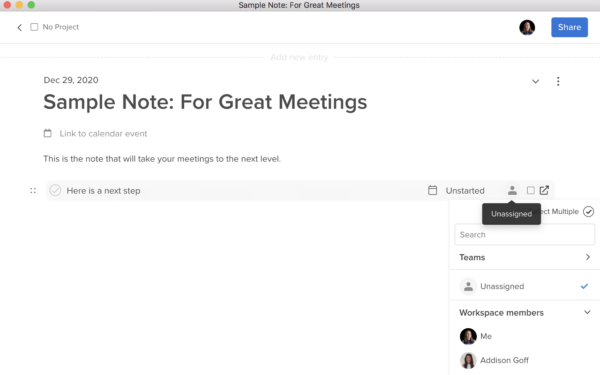
Next, you can assign the next step to someone on your team by clicking on the assignee section and selecting a team member from the dropdown. You can also easily assign a due date.
Bonus: Leverage Hive Notes in your Zoom meetings
If you do use Zoom for your meetings, our newest Hive Notes app for Zoom lets you utilize all of the features of Hive Notes, right inside your Zoom meeting window. This means you can access your notes, collaborate in real time, and even assign actions to others -– without the need to open another tab. This app is available to anyone for free, regardless of whether they use Hive, which means that all participants in your meetings can collaborate on Notes and enjoy your most productive meetings yet.

To get Hive Notes, simply click on the “Apps” section at the bottom of your Zoom meeting window and search for Hive Notes. Once you’re signed in, you can access any of your existing Hive Notes from within the Zoom window. And if you didn’t already create a note for the meeting, you can create one instantly and share it with everyone in just a few clicks.
Step 6: Follow up and track progress
When you use Hive Notes, you can continue working on a project even after the meeting ends. Share your note with anyone who wasn’t able to attend, or with anyone who needs to be updated on your work. Hive Notes are dynamic, meaning they update in real-time as actions are completed or edited in a project. This means you can revisit your Note at any time to see which tasks have been completed, are in-progress, or haven’t been started yet.
Have this meeting at the same time next week? Click “Add new entry” and the next note entry will populate with the same meeting details. With all of your past meeting notes stored in the same thread, you can easily revisit old meeting notes or next-steps.
Extra: Turn your emails into actions in your project
Need to follow-up with teammates or external parties after the meeting? You can do that from inside Hive with Hive Mail. To enable Hive Mail, visit the aforementioned Apps section on the left-hand tool bar and select Hive Apps. Hive Mail is an available app listed here. Toggle it on, and sign in to your email account, authorize the connection, and you’ll be all set!
Utilizing Hive Mail is the best way to make sure no follow-up action item gets buried in your inbox. Here are ways to use Hive to take action on those post-meeting emails:
1. Turn your email into an action card in Hive
Actions you create from an email will be private and assigned to you by default, and the email thread will live in the action card. To create an action from an email, click into the email from your Hive Mail inbox, then click the checkmark icon above the message. You’ll then be able to access it from My Actions.
 2. Link emails to existing actions
Receive an email that’s relevant to your meeting, or something you’re already working on? You can link emails to existing actions as well! To do so, click into the email from your Hive Mail inbox, then click the link icon above the message. This will embed the email thread into your action card.
3. Reply or forward messages right from your action cards
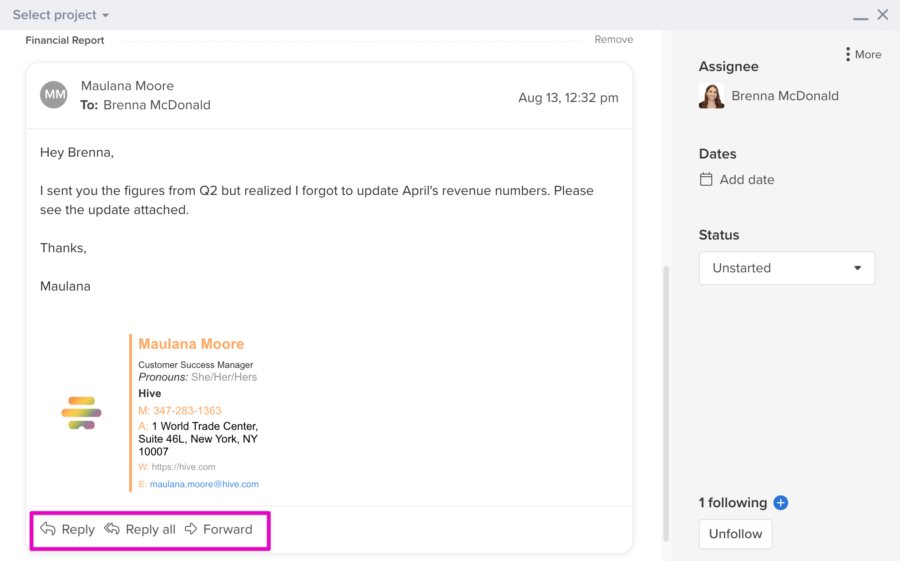
No need to hop from action card to inbox. With Hive Mail, you can reply, reply all, or forward messages right from the action card. Circling back has never been easier.
4. Send a new email from within an action card
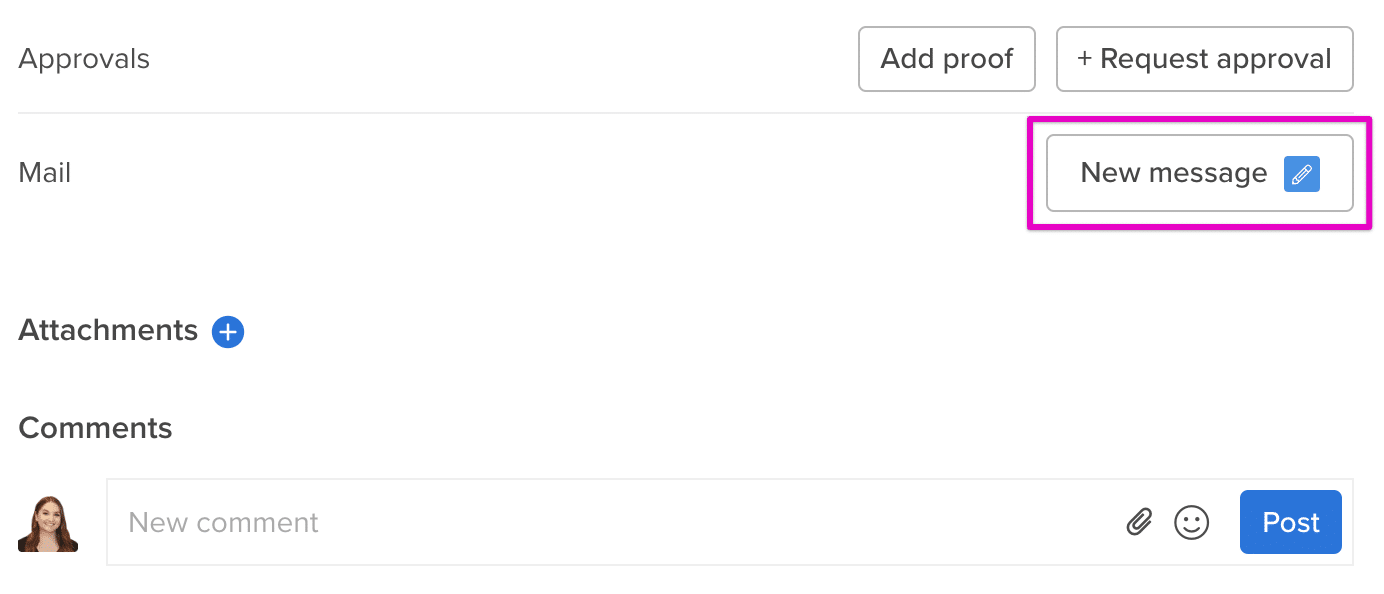
Click the New Message button to begin a new email chain that will live in the action card.
Using Hive’s email functionality will also help maintain visibility across your entire team. Because email threads linked to action cards are dynamic, they will update with any additional replies that are sent or received. Anyone who has access to the action card will be able to view and reply to the linked messages, ensuring that everyone stays up to date with the latest.
